

How To Draw Stephen Curry Step By Step
This tutorial explains how to proportion and describe a male person face. It includes detailed explanations and illustrated examples for each step and tin utilize to any medium you choose to describe in.
This tutorial covers the following step of cartoon a male face:
- Drawing the Head
- Cartoon the Detail of the Head Shape
- Dividing the Face Proportions
- Placing the Eyebrows
- Placing the Nose
- Placing the Ears
- Placing the Eyes
- Placing the Rima oris
- Cartoon the Face up Shape Details
- Cartoon the Details of the Facial Features
- Drawing the Pilus
- Drawing the Hair Details
In add-on to providing instruction on drawing a male face the tutorial also provides instructions on how to approach the drawing procedure in general in the right way.
If you are going to exist following forth with pencil and paper be certain to make light lines for the initial part of the drawing process so that you tin so easily erase any guide lines.
Defining Features of a Male Face
Some defining features of a male face compared to a female i are more pronounced features and a rougher overall shape with sharper corners.
Males also tend to take longer faces and bigger and wider jaws.
Male Facial Proportions
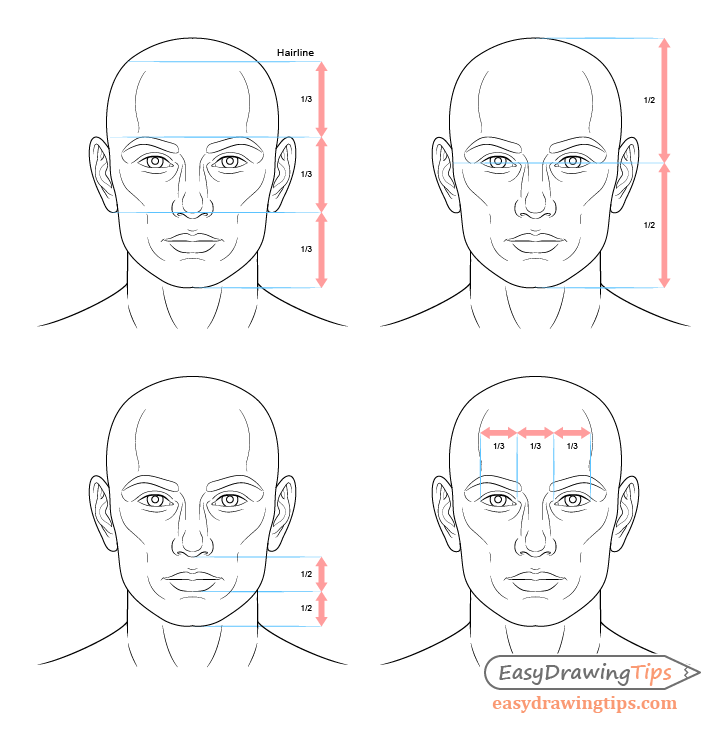
Before y'all brainstorm cartoon it's good to have an idea of where the different facial features are more often than not located though this volition also be covered in each individual step.
Dissimilar heads and faces can vary in shape and size too as in the shapes and sizes of their facial features. There is no ane proportions guide that will perfectly fit every face up.
With that said this guide does provide a good foundation that tin can help yous avoid making major mistakes when cartoon a face. Just call up that it's flexible, significant that the proportions and placement of some facial features can be adapted based on different face types.
How to Draw a Face
- Depict the biggest shapes first and work your way down to the smaller shapes and details.
- Sketch out simplified shapes of the facial features and refine them after yous have positioned all of the major parts of the face.
- Proceed different parts of you drawing in roughly the same state of completion. For instance you practice not want to fully draw out one eye and so notice out that it looks off when you place the second eye. The right way to depict is to commencement place both optics by cartoon the outline shape of each.
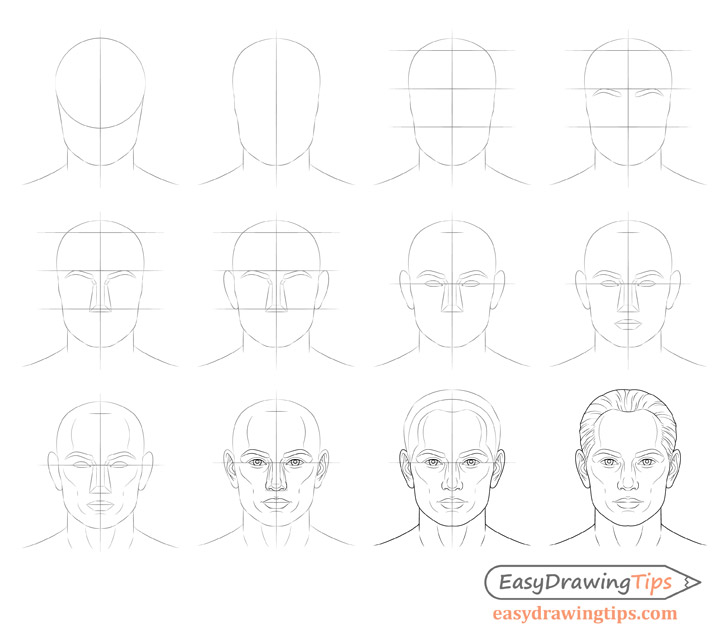
Stride 1 – Drawing the Head
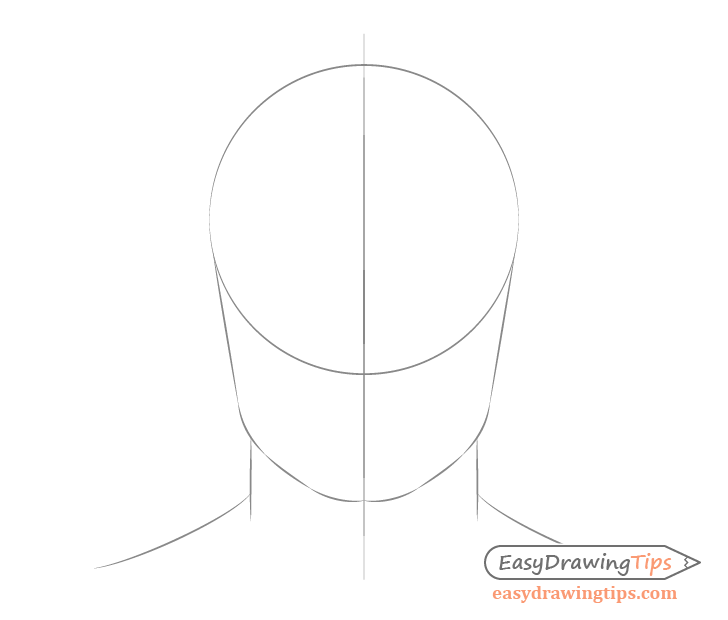
Start your drawing by making a vertical line in the middle of your drawing expanse. This line volition assist you insure that both halves of the head and face are of even width and that the facial featuers will be placed symmetrically.
Make a circle for the summit of the head. From that circle depict two lines going down towards one another followed by two curves and two more lines. Finally join these with nonetheless another curve to to create the bottom of the chin.
Pace two – Drawing the Detail of The Caput Shape
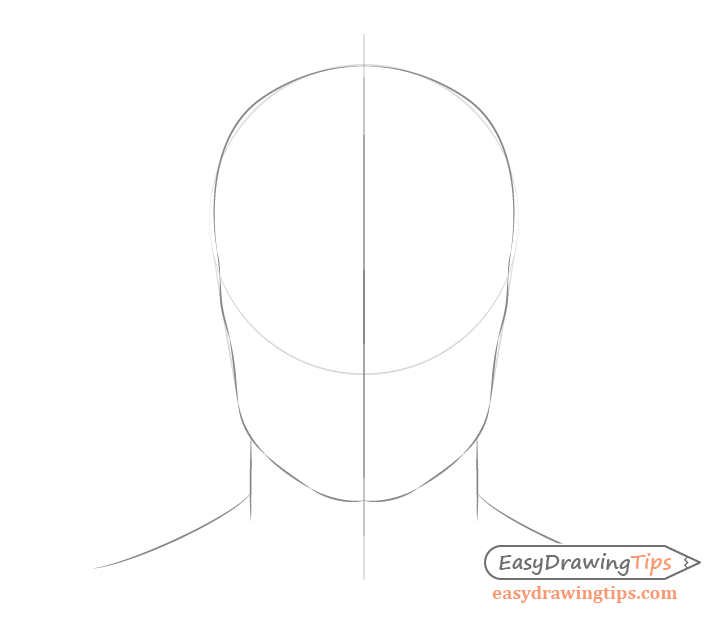
Refine the shape of the top of the caput based on the above example. In this case we will ingather some of the circle effectually the sides of the head and make the height expanse a little less curved. Afterwards draw in the outer shapes of the cheek basic.
Yous can erase the circle guidelines afterwards you lot are done with this step.
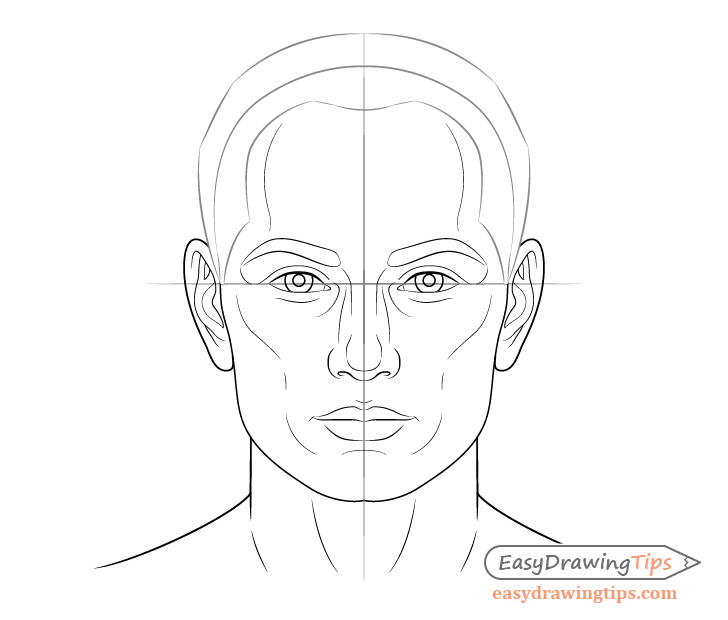
Step 3 – Dividing the Face Proportions
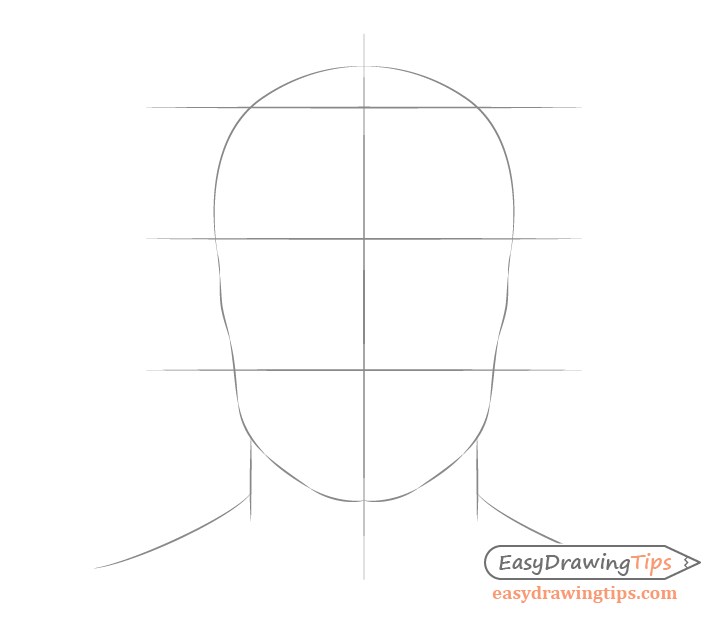
Divide the face into four parts using horizontal lines. Describe these lines starting from the hairline (placed slightly below the top of the head) downward to the mentum to create three evenly spaced portions of the face plus the fourth smaller one at the very superlative.
Step four – Placing the Eyebrows
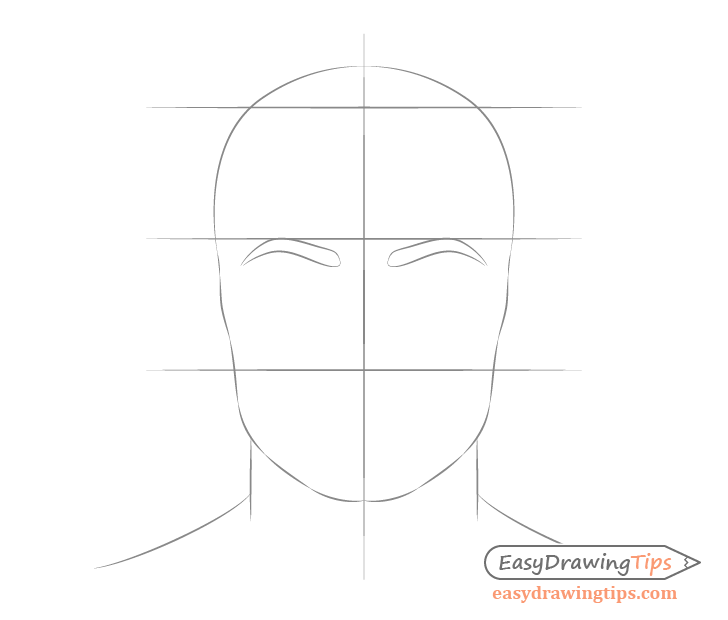
Sketch the eyebrows directly below the second line from the top. As the eyebrows are non a very complex shape you tin can draw them without too much simplification.
Footstep five – Placing the Nose
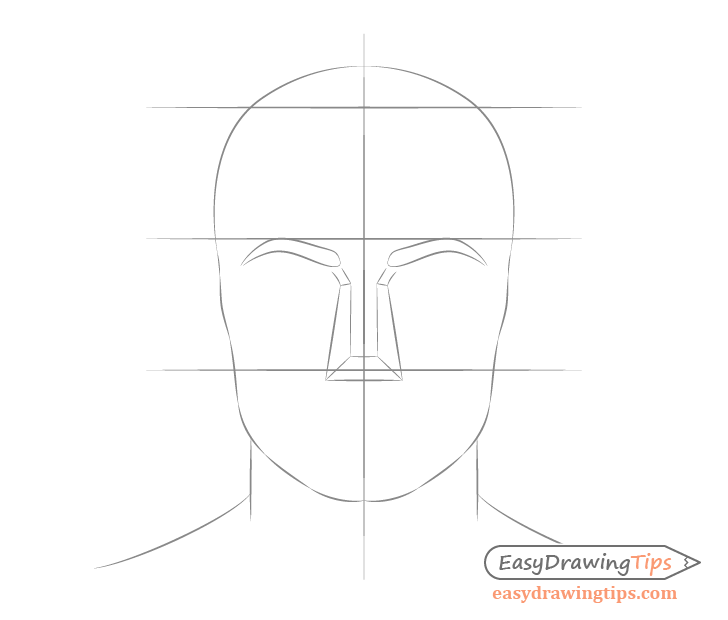
The nose starts near the inner tips of the eyebrows. Y'all can first sketch out the nose as a simplified shape with flat planes for the front, sides and lesser. Describe the nose narrower equally information technology gets closer to the bridge and from in that location it should widen again towards the mouth surface area.
The nose volition go downwardly slightly by the middle portions of the three even divisions of the face. Longer noses tin can go farther downwardly while shorter noses can be closer to the bodily line.
Step 6 – Placing the Ears
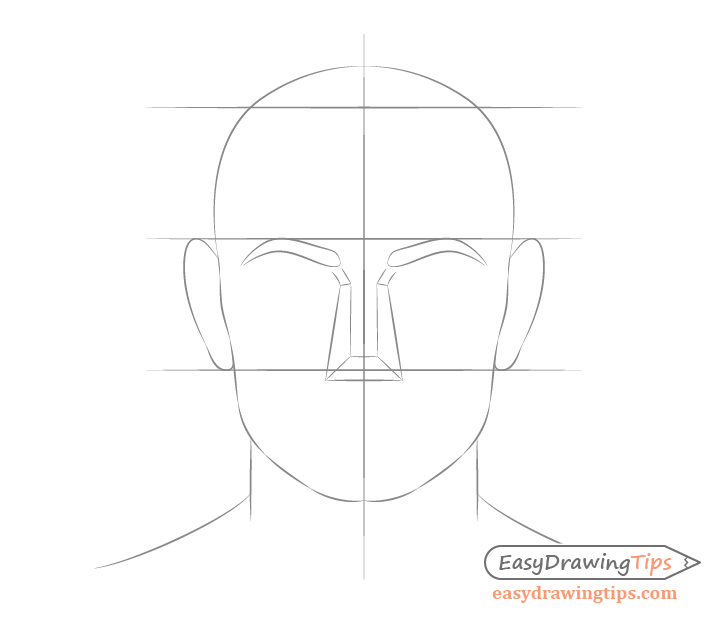
Draw the shape of the outline of the ears inside the center portion of the three evenly spaced divisions touching the second and tertiary line from the top.
Stride seven – Placing the Optics
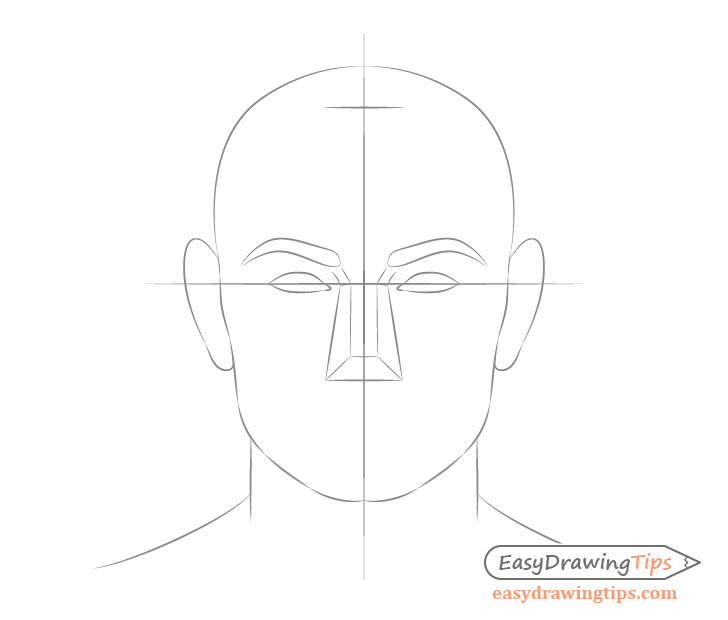
Depict another line directly through the centre of the head and on information technology draw the outline shape of the optics (don't draw the pupils at this stage). Place the eyes far enough apart that you can fit another eye in betwixt them. Be sure to as well leave enough space on the side of each eye. This volition usually be slightly less then the width of an eye.
Pace 8 – Placing the Mouth
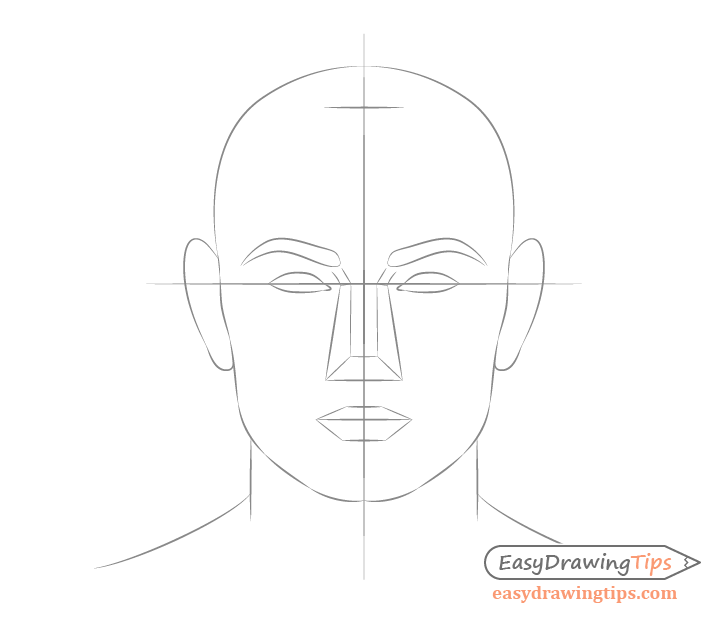
Draw a line between the bottom of the nose and the bottom of the chin. This line will stand for the very lesser of the bottom lip. Above that you can draw two more lines to indicate the oral cavity opening and the height of the top lip. The bottom lip will ordinarily be "taller" than the top lip then infinite the lines appropriately.
For more than on drawing lips see:
How to Draw Different Types of Lips
Once yous place these lines y'all tin can describe four more lines going from the sides of the bottom and top line to the sides of the middle line to create the rough shape of the oral fissure.
Subsequently the facial features are placed you should have a fully proportion sketch of the face up.
Step 9 – Face up Shape Details
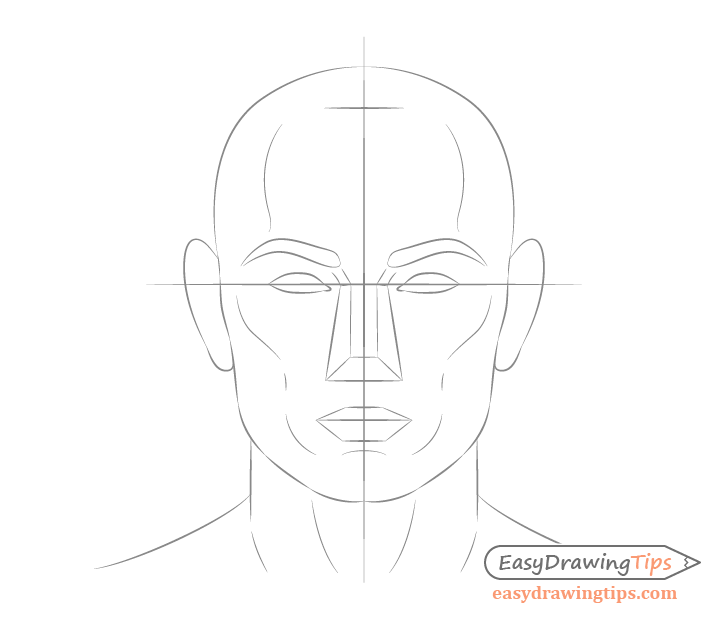
Draw a set of lines to indicate the inner parts of the cheekbones. From there draw a pair of lines going directly downwards the face and curving around the mouth towards the upper half of the chin. Yous tin can draw the upper part of the mentum with a curved line merely a footling bit beneath the bottom lip.
Yous tin can too point the forehead with merely a few curved lines. Keep in mind that in the front view this area sort of curves outwards around the eyebrows.
Step 10 – Cartoon the Details of the Facial Features
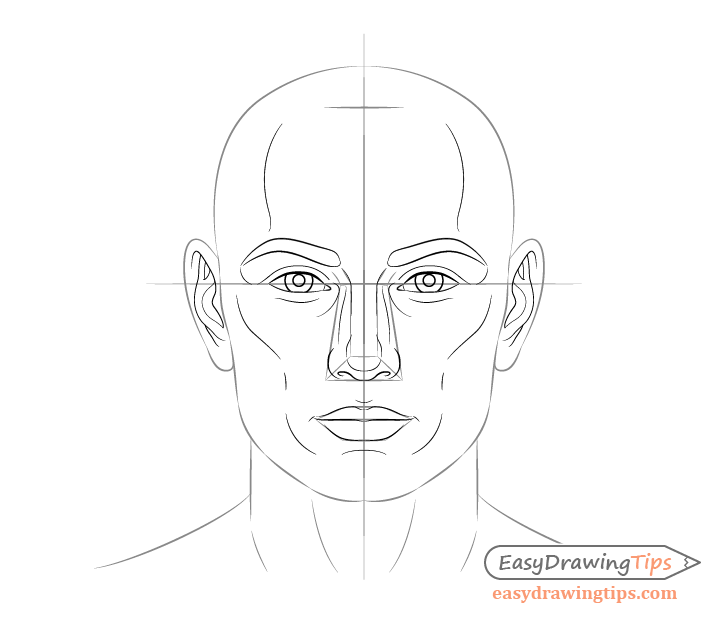
Based on the placement sketches of the diverse facial features y'all can at present create more detailed drawings.
Step by Pace Male person Eye Drawing
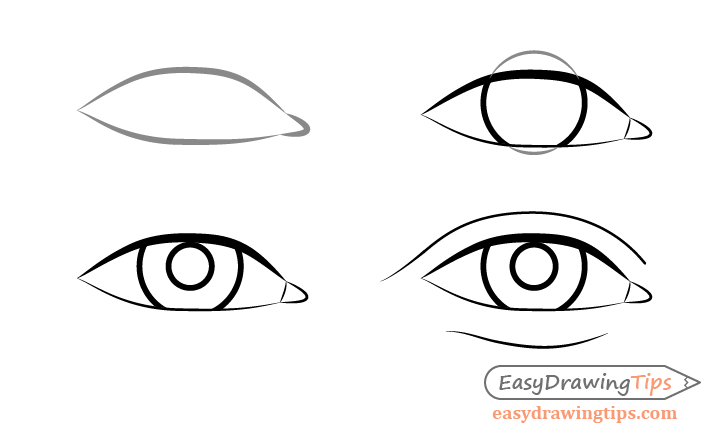
The irises of the eyes will be covered by the top eyelid and oftentimes very slightly by the bottom eyelid likewise.
With that said don't forget that in this view the irises are basically circles. Yous may want to fully describe them out over the top of the eyelids and erase the covered parts afterward merely to make sure you draw a proper circle.
Fore more on cartoon eyes besides see:
How to Depict Eye Expressions Footstep past Step
Step past Stride Male Lips Drawing
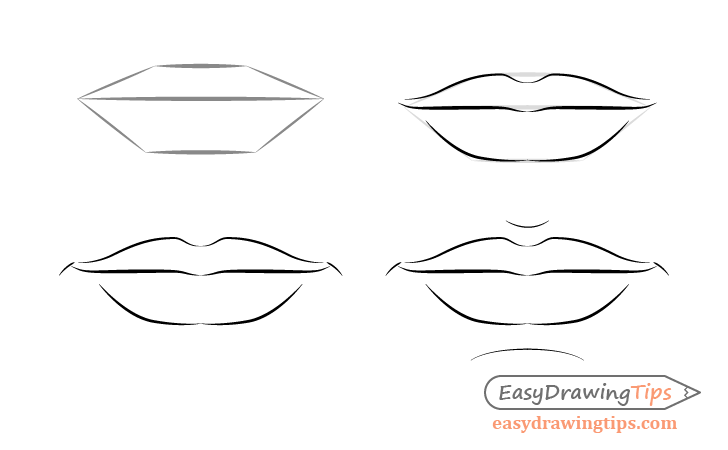
Draw the top lip as a sort of flattened "M" shape.
One of import affair to notation most the lips that may not be so obvious is that the bottom lip is actually composed of two lite curves (more obvious in some people than others).
Stride by Step Male Nose Drawing
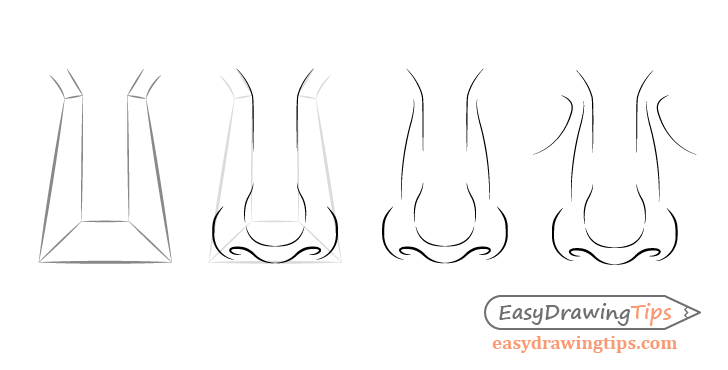
The nose is can be a little tricky to draw as its a fairly irregular shape. Generally the tip will be close to a circular shape. The position of the tip can vary from person to person. You tin can signal the sides of the olfactory organ with ii curved lines.
Stride by Footstep Male Ear Drawing
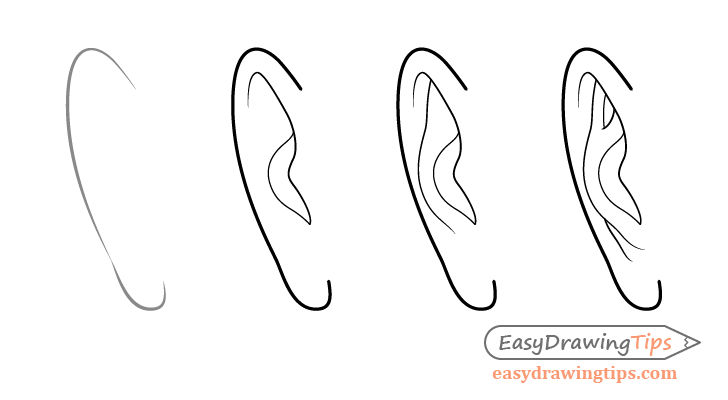
The ears are very irregular in their shape. Y'all may want to encounter the ear cartoon tutorial for more than on drawing them.
- How to Draw an Ear From the Front Footstep past Stride
- How to Draw an Ear Pace by Step – Side View
Generally in this view you will have an inner shape inside the ear that sort of warps out around the ear holes and slightly sticks out to the sides . Information technology then branches out in two towards the top.
Eyebrows
The eyebrows are adequately unproblematic to draw then you tin can just go over the shape you drew earlier and refine it equally needed.
Stride 11 – Drawing the Hair
Start drawing the hair past offset outlining the hairline. Later that outline the acme shape of the hair.
The hairline tends to go upwardly from the ears curving to to a higher place the eyebrows. From in that location it curves again towards the centre of the forehead. Near the heart of the brow the hairline starts curving down.
Step 12 – Cartoon the Hair Details

For the last step you volition want to add some details to the hair.
For this particular hairstyle (combed dorsum short pilus) the pilus will sort of fan out from the center of the head and curve downwards and bespeak even more downwards every bit it progresses towards the ears.
Indicate the different pilus clumps and pilus past cartoon some lines in the directions described above. Attempt and vary these in length and altitude from ane some other as well every bit their start and cease points to give the hair an uneven and more natural look.
For more than on drawing different male hair styles see:
How to Depict Male person Hair Pace by Step
Conclusion
It tin can exist very difficult to correctly proportion and draw a face but hopefully this tutorial has given you some adept insight into drawing male faces. If you would like some more tips on drawing diverse facial features you lot tin can check out the Tutorials department of the website.
For drawing a female confront encounter:
How to Draw a Female person Face Step past Step Tutorial

Source: https://www.easydrawingtips.com/how-to-draw-male-face-step-by-step-tutorial/
Posted by: browningfroppres.blogspot.com
0 Response to "How To Draw Stephen Curry Step By Step"
Post a Comment